How to Add Jewelry to a Model in Photoshop
Reading Time: 3 minutesDisplaying your jewelry on a model will be more appealing to potential customers. Can’t find a model? Use a stock image and Photoshop.
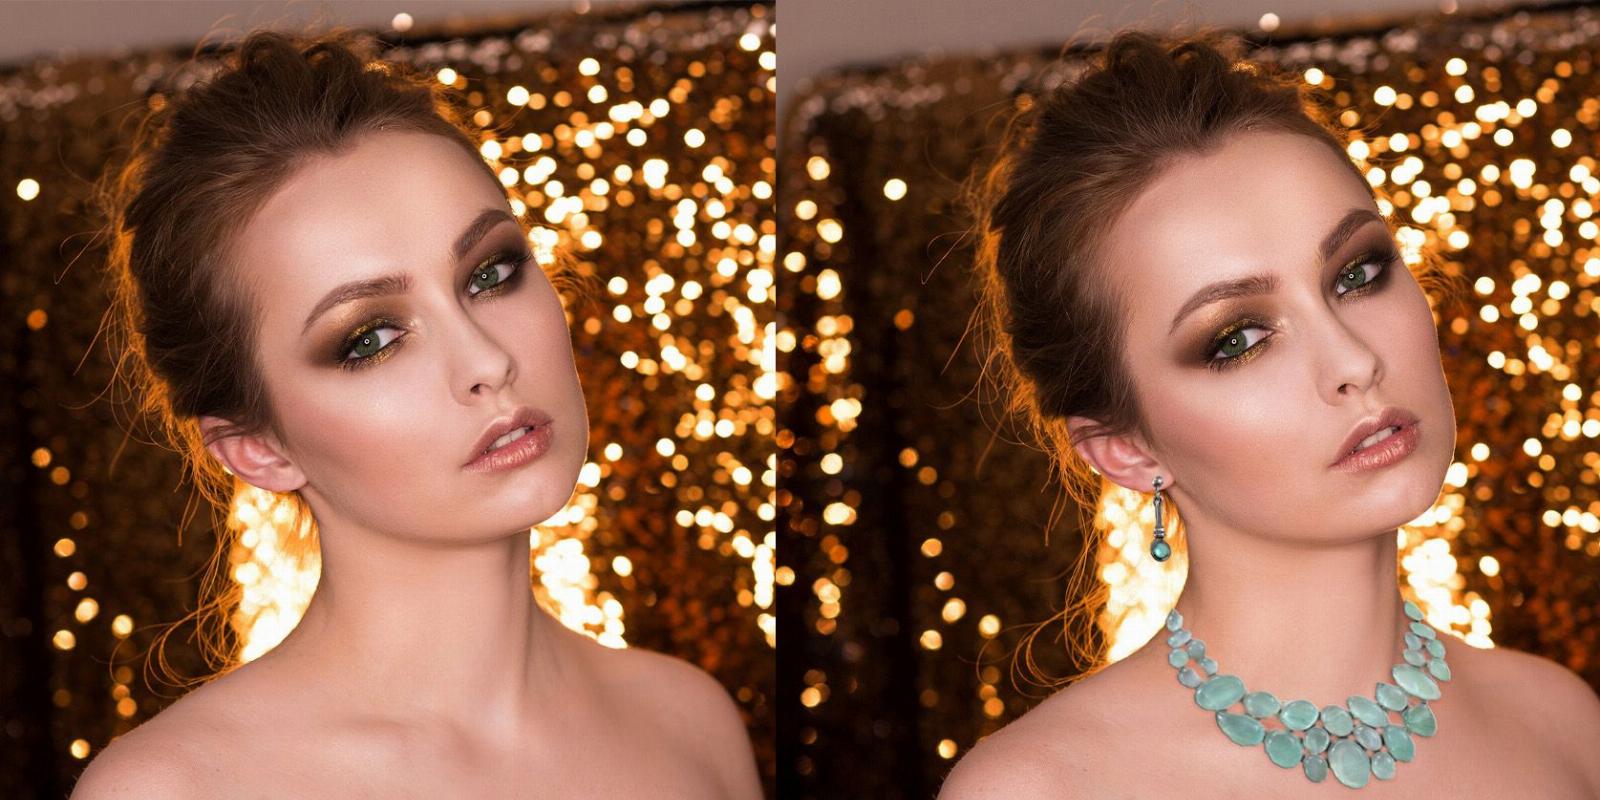
Are you a small business owner selling jewelry online? To run a successful e-commerce store, your website and its pictures must be top-notch. You want to ensure your jewelry photos urge the viewers to buy and try them on.
As a small business owner or hobbyist, you may not have the budget or resources to hire models to wear your jewelry. But a piece of jewelry on a model is much more appealing than one on a mannequin or display. Thanks to photo editing software like Photoshop, you can add jewelry to model photos.
How to Add Earrings and a Necklace to a Stock Photo Model
You can download a suitable model photo from a stock website. We have downloaded the model image, earrings, and necklace images from Pixabay for this demonstration, but you’d be using your own jewelry shots.
If you want to take beautiful jewelry photos, clean the jewelry and ensure they are in a well-lit area. Use artificial lighting if needed. Also, using a white or black background is a good idea as it makes editing easier.
Are you new to Photoshop? No worries, learn some quick tips for Photoshop to get started.
Step 1: Import Your Images
Open the model and jewelry images in Adobe Photoshop on your computer. Go to File > Open and select the images. Alternatively, use Ctrl + O (Cmd + O on Mac).
Step 2: Select the Necklace
Go to the necklace photo. Find the Object Selection tool on the left side. You can also press W to find the tool.
Select the area on the necklace you will use on the model. Generally, you will choose the front part of the necklace.
Step 3: Add the Necklace to the Model
Go to Edit > Copy to copy the selected area of the necklace. Next, go to the model’s photo and use Edit > Paste to paste the necklace. You can also use Ctrl + C to copy and Ctrl + V to paste.
The necklace will be a new layer on the model’s photo.
Step 4: Adjust the Necklace to Make It Look Realistic
Go to Edit > Free Transform or press Ctrl + T to change the size and angle of the image.
You can use other transformation tools like Warp and Skew to fine-tune the necklace to look natural and realistic.
Go to Edit > Transform > Warp and adjust the shape and perspective of the necklace. Experiment with different things in the Transform option to get your desired look.
Step 5: Match the Jewelry With the Model’s Skin Tone
Use the Eraser tool on the left side panel to erase the background of the jewelry and blend it with the skin tone.
Adjust the Brush Size as needed.
Zoom in on the image and clean the tiny areas between the jewelry.
Step 6: Add Shadows for a Natural Look
Right-click on the necklace layer in the bottom right corner. Click on Blending Options.
Click on Drop Shadow, and set the Blend Mode to Soft Light. Of course, you can play around with other options too. Similarly, adjust the Opacity, Angle, Distance, Spread, and Size to your liking.
Go to Bevel & Emboss and enable Contour to give a nice edge around the necklace.
Step 7: Add the Earrings
Follow the exact steps above to add the earrings to the model.
In our samples, the earrings and necklace are different colors. So, we used the Brush tool to paint the earring the same color as the necklace.
To pick the color from the necklace, use the Color Picker tool. Click on the color tabs and use the color picker to choose a spot on the necklace. Then, paint over the earrings.
Step 8: Export Your Image
Your final image is ready with the jewelry on the model. Go to File > Export > Export As.
Set the Format to JPG and the Quality to High.
You can export in other formats too, but JPG is easier to share and use on your online store.
Display Your Jewelry on a Model
One of the essential advertising mantras is to evoke an emotional response from your viewers. That’s why using people in your shots is a great strategy to sell your products.
But, using real models for your jewelry photos may not always be possible. With Photoshop and stock websites, you can add all your jewelry to different models without going through all the hassles of finding them. Also, you have a greater chance of finding diverse models to fit into your branding.
Reference: https://www.makeuseof.com/photoshop-how-to-add-jewelry-to-model/
Ref: makeuseof
MediaDownloader.net -> Free Online Video Downloader, Download Any Video From YouTube, VK, Vimeo, Twitter, Twitch, Tumblr, Tiktok, Telegram, TED, Streamable, Soundcloud, Snapchat, Share, Rumble, Reddit, PuhuTV, Pinterest, Periscope, Ok.ru, MxTakatak, Mixcloud, Mashable, LinkedIn, Likee, Kwai, Izlesene, Instagram, Imgur, IMDB, Ifunny, Gaana, Flickr, Febspot, Facebook, ESPN, Douyin, Dailymotion, Buzzfeed, BluTV, Blogger, Bitchute, Bilibili, Bandcamp, Akıllı, 9GAG